- OSCAL
- Problem(s) Definition
- Solution… OSCAL?
- Further Reading
- Tools and Content
OSCAL
…OSCAL is a set of formats expressed in XML, JSON, and YAML. These formats provide machine-readable representations of control catalogs, control baselines, system security plans, and assessment plans and results. (OSCAL – Open Security Controls Assessment Language)
- Easily access control information from security and privacy control catalogs
- Establish and share machine-readable control baselines
- Maintain and share actionable, up-to-date information about how controls are implemented in your systems
- Automate the monitoring and assessment of your system control implementation effectiveness
Problem(s) Definition
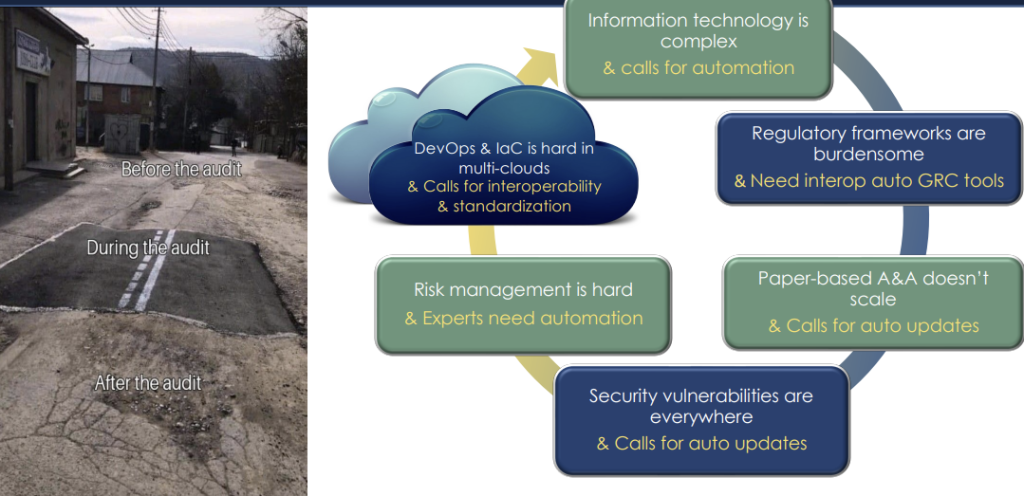
- InfoSec / Compliance / Risk Management is not integrated with IT operations and monitoring
- More Organizations are required to comply with more standards
- ISO 27001, ACSC Essential Eight / ASD ISM, PSPF, PCI DSS, Cyber Assessment Framework, ISO 22301, GDPR, Common Cloud Controls, Cyber insurance – Wikipedia (e.g.: Chubb, HSB), NIST 800-53: Security and Privacy Controls for Information Systems and Organizations, 800-171: Protecting Controlled Unclassified Information in Nonfederal Systems and Organizations, 800-53A Revision 5: Assessing Security and Privacy Controls in Information Systems and Organizations, CSA – Cloud Controls Matrix (CCM), CIS Controls 8.1
- Emerging IT patterns/paradigms mean that Point-In-Time auditing and documenting is more difficult, more costly, less useful as validity is harder to maintain and potentially counter-productive (erroneous documentation / reported state can lead to poor decision making, particularly in incident response)
- Emerging patterns include: Infrastructure/Configuration as Code, Immutable Infrastructure, Containerization, Cloud, Event-Driven Architecture, DevOps, DevSecOps, Continuous Integration and Continuous Delivery/Deployment Function as a Service
Static documentation and point-in-time auditing is not scalable or maintainable.
So – we need to move to:
- Security as Code
- Docs as Code / Policy as code
- Compliance as code
- Audit as Code
- Risk as Code
Solution… OSCAL?
Integration of InfoSec and Operations
- Unified Security Framework: OSCAL provides a structured, standardized format for representing security controls, assessments, and system configurations. This allows InfoSec, compliance, and risk data to be integrated directly into IT operations and monitoring tools.
- Automated Compliance Monitoring: OSCAL is machine-readable, which enables automated monitoring of compliance status across various standards (ISO 27001, PCI DSS, NIST 800-53, etc.). It can help keep compliance and InfoSec teams in sync with real-time IT operations.
- Alignment with Continuous Monitoring: OSCAL facilitates a continuous approach to compliance by embedding compliance checks within the CI/CD pipeline, helping teams maintain compliance as part of routine IT operations.
De-duplicate Compliance
- Standardized, Interoperable Format: OSCAL provides a common language for multiple security and compliance standards, enabling organizations to map controls across frameworks (e.g., ISO 27001, NIST 800-53, GDPR, Essential Eight) without duplicating work.
- Control Mapping: OSCAL enables the mapping of controls between different frameworks, allowing organizations to efficiently demonstrate compliance with multiple standards simultaneously.
- Reuse of Control Implementations: By using OSCAL, organizations can document controls once and reuse them across multiple standards, reducing the effort needed to comply with additional frameworks.
Handle emerging IT Patterns
- Dynamic and Automated Documentation: OSCAL supports a “docs as code” approach, where documentation is maintained as machine-readable code. This helps keep security and compliance documentation up to date automatically, even as infrastructure and configurations change frequently.
- Alignment with IaC and CaC: OSCAL is designed to work alongside Infrastructure as Code (IaC) and Configuration as Code (CaC), enabling real-time validation of compliance as infrastructure changes are deployed.
- Support for Continuous Compliance: Since OSCAL models are machine-readable, compliance checks can be integrated into CI/CD pipelines, providing continuous compliance validation instead of relying on point-in-time audits.
Dynamic documentation and reporting
- Machine-Readable, Version-Controlled Documentation: With OSCAL, compliance documentation can be version-controlled, traceable, and maintainable. This is essential for adapting to changes in dynamic environments like cloud and DevOps.
- Audit as Code: OSCAL enables automated auditing by allowing assessments to be defined as code. This helps maintain an accurate picture of compliance posture and enables on-demand, real-time audits.
- Reduction of Documentation Errors: By automating compliance and risk management, OSCAL reduces the risk of human error in documentation, helping ensure that reports and records are up to date and accurate.
Security, Compliance, Policy as Code
- Compliance as Code: OSCAL enables organizations to define compliance requirements as code, automating adherence to various regulatory standards. This helps reduce time and effort in maintaining compliance across multiple standards.
- Policy as Code: OSCAL can work with policy engines (like OPA) to enforce policies directly within cloud and containerized environments, making policies enforceable and traceable.
- Security as Code and Risk as Code: With OSCAL, security and risk management activities can be managed as code, automating assessments, updating control implementations, and maintaining an accurate view of risk at any given time.
Improve accuracy and efficiency
- Scalable Compliance Management: OSCAL provides a modular and extensible approach to compliance, which can scale with organizational growth. Its support for automated assessments and control documentation reduces the need for manual updates.
- Improved Incident Response and Decision-Making: By providing an accurate, up-to-date picture of the security posture, OSCAL improves decision-making, especially during incident response. Real-time insights into compliance reduce the chances of errors due to outdated information.
- Consistency Across Environments: OSCAL’s machine-readable formats ensure consistent compliance documentation and processes across all environments—whether cloud, on-premises, or hybrid—reducing the potential for configuration drift or misalignment between standards.
Key Concepts / Terms

1. Control
- A requirement or guideline that, when implemented, mitigates risks associated with information systems. Controls are central to frameworks and standards for security and privacy.
- Control Objective
- Describes the intended outcome of a control, specifying what it aims to achieve in terms of security and compliance.
- Control Enhancement
- Additional, optional requirements that extend a control’s effectiveness or specificity. Enhancements offer extra layers of security or risk reduction.
- Statement
- A specific requirement within a control, providing a unit of meaning that can be evaluated for compliance.
- Control Parameter
- Variable aspects within a control that allow customization (e.g., password length). Parameters help tailor controls to organizational needs.
- Control Parameter Value
- The specific value assigned to a control parameter, used to set details like minimum password length in a control implementation.
2. Catalog
- An organized collection of controls within a framework. Catalogs allow for grouping controls and, when needed, include subordinate control requirements, control objectives, assessment methods, references, and other content.
- Control (as defined above)
- Control Implementation
- Describes how each control in the catalog is implemented by an organization, including the settings, roles, and configurations specific to that organization.
- Implemented Requirements
- The documented controls that an organization has put in place, aligned with the overall compliance program.
3. Profile
- A tailored selection or view of controls within a catalog, allowing customization based on specific standards, regulations, or internal policies.
- Parameter (within a Profile context)
- A variable within the profile that allows control customization, often by setting specific values for requirements based on the organization’s needs.
4. Assessment Plan
- A document describing the scope, objectives, and methodology of a security assessment, which outlines the controls to be tested and assessment methods to be used.
- Assessment Objective
- Specifies what will be evaluated during the assessment to verify compliance with control requirements.
5. Assessment Results
- A record of findings from an assessment, noting compliance or non-compliance with controls and including remediation recommendations.
6. Component Definition
- A modular structure that defines a specific component or group of related components (e.g., software, hardware), including configuration details and associated controls.
7. Party
- An entity, such as a person, organization, or role, associated with a control, component, or assessment process. Parties clarify responsibilities and ownership.
8. Metadata
- Descriptive information about an OSCAL document, such as author, date, version, and associated standards. Metadata aids in tracking and managing documents.
9. Back Matter
- The section of an OSCAL document that includes appendices, references, and external documents, providing additional context or support for controls and implementation
What OSCAL is / ins’t
| What OSCAL Is | What OSCAL Isn’t |
|---|---|
| Machine-Readable Representation: OSCAL formats are in XML, JSON, and YAML, making them suitable for automation and integration with various tools. | Not a Standalone Compliance Tool: OSCAL provides a format, not the tooling, and must be implemented within a larger compliance platform. |
| Standardized Control Catalogs: OSCAL defines catalogs that group control requirements from standards like ISO 27001, NIST 800-53, and PCI DSS. | Not a Security or Compliance Framework: OSCAL doesn’t define the controls; it encodes existing frameworks and standards in a standardized way. |
| Dynamic Control Baselines: It allows organizations to establish and tailor control baselines to fit their unique regulatory and security requirements. | Not a Substitute for Governance: OSCAL automates compliance documentation but does not replace governance, oversight, or accountability. |
| Actionable Documentation of Control Implementations: Provides up-to-date, shared documentation on control implementation for continuous compliance. | Not an Out-of-the-Box Solution: OSCAL requires integration, tooling, and expertise to deploy effectively and isn’t a quick-fix compliance solution. |
| Automated Monitoring and Assessment: OSCAL enables organizations to automate monitoring and auditing compliance status across various standards. | Not a Magic Bullet for All Standards: Some standards may need additional customization or extensions beyond what OSCAL currently provides. |
Example User Stories
User Story:
“As a compliance manager, I want to automatically generate reports to demonstrate compliance with multiple standards (e.g., ISO 27001, PCI DSS, and NIST 800-53) so that our organization can meet regulatory requirements without manually mapping controls.”
OSCAL can be used to map overlapping controls across different frameworks within a standardized catalog, allowing the organization to document compliance with multiple standards simultaneously. The compliance manager could use OSCAL profiles to create tailored control sets for each standard, reducing redundancy in reporting and improving accuracy.
User Story:
“As an Information Security officer, I want to maintain a central repository of all control implementations and assessment data that updates dynamically, ensuring accurate, up-to-date compliance documentation.”
OSCAL assessment plans and results allow the auditor to automate control testing and assessments. By creating OSCAL-based assessment plans, they can automatically gather evidence from various systems and compare it against expected control implementations, producing a comprehensive assessment report with minimal manual effort.
User Story:
“As a DevSecOps engineer, I want to automatically validate compliance of our infrastructure configurations every time a change is made, so that our organization maintains security and compliance requirements in real-time.”
By integrating OSCAL into CI/CD pipelines, the engineer can set up automated compliance checks, validating that each infrastructure change meets regulatory and security requirements. For example, an OSCAL profile with necessary compliance controls could trigger automated scans of IaC (Infrastructure as Code) files to confirm they match the control requirements.
User Story:
“As a board member, I want confidence that the organization is consistently meeting regulatory and compliance standards across all jurisdictions, reducing legal and reputational risks.”
By adopting OSCAL, the organization can maintain a centralized, machine-readable repository of compliance data aligned with multiple standards (e.g., GDPR, ISO 27001, PCI DSS, NIST 800-53). This enables consistent and reliable compliance reporting across regions and jurisdictions, reducing the risk of non-compliance penalties or brand damage. Board members can rely on OSCAL-backed compliance dashboards to ensure the company is always prepared for regulatory scrutiny.
User Story:
“As an internal auditor, I want to automate control assessments to efficiently evaluate and report on compliance status without extensive manual documentation.”
OSCAL assessment plans and results allow the auditor to automate control testing and assessments. By creating OSCAL-based assessment plans, they can automatically gather evidence from various systems and compare it against expected control implementations, producing a comprehensive assessment report with minimal manual effort.
Further Reading
Authoritative source:
- usnistgov/OSCAL: Open Security Controls Assessment Language (OSCAL)
- OSCAL – Open Security Controls Assessment Language
Other:
Tools and Content
Helpful aggregation list: awesome-oscal: A list of tools, blog posts, and other resources that further the use and adoption of OSCAL standards.
- defenseunicorns/go-oscal: Repository for the generation of OSCAL data types
- Go CLI + libs
- GoComply/oscalkit: NIST OSCAL SDK and CLI
- Barebones Go SDK for OSCAL, A CLI tool is also included for processing OSCAL documents, converting between OSCAL-formatted XML, JSON and YAML
- GoComply/fedramp: Open source tool for processing OSCAL based FedRAMP SSPs
- take FedRAMP/OSCAL formatted System Security Plan and outputs FedRAMP document
- take open control repository and produce FedRAMP/OSCAL formatted System Security Plans
- RedHatProductSecurity/trestle-bot: A workflow automation tool for `compliance-trestle`
- everaging Compliance-Trestle in CI/CD workflows for OSCAL formatted compliance content management.
- EasyDynamics/oscal-editor-deployment: Various deployments of the OSCAL editor
- mocolicious/OSCAL-Examples: Examples of OSCAL formats
- multiple sample development environments to demonstrate the usage of the OSCAL formats.
- oscal-club/oscal-cli-action: A GitHub Action to process, convert, and validate OSCAL content with the NIST oscal-cli tool.
- A GitHub Action to process, convert, and validate OSCAL content with the NIST oscal-cli tool.
- oscal-deep-diff: Open Security Controls Assessment Language (OSCAL) Deep Differencing Tool
- A Typescript-based CLI application and library that produces machine readable and human-consumable comparisons of JSON OSCAL artifacts.
GRC Products using OSCAL:
- GovReady/govready-q: An open source, self-service GRC tool to automate security assessments and compliance.
- The GovReady-Q Compliance Server is an open source GRC platform for highly automated, user-friendly, self-service compliance assessments and documentation. It’s perfect for DevSecOps.
- RegScale | Automated Governance, Risk & Compliance Software – RegScale repositories
- RegScale Community Edition is a free to use, real-time Governance, Risk and Compliance (GRC) platform that deploys in any environment, integrating with security and compliance tools via API to keep compliance documentation continuously up to date
Tools from NIST:
- liboscal-java: A Java library to support processing OSCAL content
- oscal-cli: A simple open source command line tool to support common operations over OSCAL content.
- oscal-xslt: Open source XSLT for OSCAL display and processing – assumes xml, supports yaml, no json.
Other tools I looked at:
- RS-Credentive/oscal-pydantic at oscal-pydantic-v2 – Several Python projects include data models, but importing a large project just to get access to the datamodel represents a significant overhead. This module simply provides the models.
- OSCAL-GUI: Joint NIST/FedRAMP tool to interact with OSCAL files via a browser-based GUI – PHP, XSLT
- CivicActions/ssp-toolkit: Automate the creation of a System Security Plan (SSP) – Python + Jinja, tool for generating FedRAMP SSP doc
- SHRgroup Compliance As Code · GitLab
- SHRgroup / Public / Compliance As Code / IAC 2 OSCAL · GitLab
- SHRgroup / Public / Compliance As Code / oscal-cli · GitLab
- SHRgroup / Public / python / pyOSCAL · GitLab
- SHRgroup / Public / Compliance As Code / workflow-example · GitLab
- SHRgroup / Public / Compliance As Code / Example Diagrams · GitLab
- GSA/oscal-js
- npm package with command-line interface tool and wrapper for working with OSCAL – provides an easy way to install, update, and use the Java-based OSCAL CLI and OSCAL Server tools.
- gborough/roscal: Open Security Controls Assessment Language Toolbox
- collection of tools and libraries for OSCAL in Rust
- JJediny/oscal-static-site-playground
- providing developers a starter kit and reference implementation for Federalist websites
